
Hardsurface / 3D Modeling Tutorial
Intro

I am a 3d artist, specifically a hard surface artist. As out of all the things I’ve created, I’ve found the most interest and cleanest work coming out of hard surface objects.
I’ve been a 3d artist for about 4 years now, and officially got into hard surface work a year ago.
Today I shall bestow what wisdom I have obtained on my journey. I am very stupid, so anything I’ve learned has come entirely through direct advice and/or thorough testing.
Warning: I am a VERY descriptive individual, so while I am going to edit this down late, I'm gonna get in-depth with my tips and though process to provide a thorough tutorial to make your workflow more professional.
So readers beware: Thou shall be reading.
----------------------------------------------------------------------------------------------------------------------------
Setup
This guide is def for people who are beginners who want to “go pro” and become intermediate. I’m going to assume you’ve already got a 3d software you’ve gotten and have at least made something. Doesn’t have to get complicated, but there’s not much point teaching you how to draw a person if you haven’t even shaded a ball. So assuming you’ve spent a few hours in a 3d software, either personally or for school, and pumped out a few objects of varying quality: You're ready to go. Also keep in mind that, while I am thorough, I’m not gonna explain EVERY nook and
cranny. Partially because some tips I forgot, but mostly because it would make this post
even MORE ridiculously long. So if you’re wondering how to do something, Google
and Youtube tutorial’s are your friends.
Alright. Lessdoet.
----------------------------------------------------------------------------------------------------------------------------
The bulk
I’m gonna go through step by step
my process; and give you what advice I can along the way. An important thing to
remember @ anytime is that this stuff takes forever. I can spend anywhere from 1
– 100 hours on a single object, depending on the size and scope. You get faster
as you go, but it'll always take time. And furthermore, your motivation will
likely dwindle as you go. This work is more consistency and patience over raw
passion, and the former will win in the long run.
So yeah. Lets get into it.
My first general tip is set up your
end goal and pipeline in advance. Gotta know where to end it, or you’ll end up
dragging on and eventually hating it.
My goal is always a game ready object, my pipeline is:
- pureref for reference gathering
- Maya for blockout, lowpoly,
highpoly, retop N Uv
- Substance Painter for baking and
texturing
- Unreal for scenes and final
renders
I also occasionally use zbrush for high poly work and photoshop for making alphas & to polish final renders. Both of which I’m not the best at,
but maximize my product with their use.
I'll walk through something simple, something most people
are familiar with:

Gameboy Advance SP!
I HIGHLY recommend you start with something simple.
You’re gonna pick up all the basics you’ll use with hard surface work, as well
as set projects scopes that won’t challenge your patience.
---------------------------------------------------------------------------------------------------------------------------
References
First
thing is to get some references. This is, without question, one of the most
important parts of the process. The better your references, the less you have
to re-correct things when you notice differences, and the less hunting for minor
things later on!
I recommend Pureref. It’s a free program that uses as an overlay window to
view your references on the fly! It can be moved, zoomed in and out, and
anything you drag or copy paste into it stays there (and can be scaled in the
overlay)

As you can see, I get every possible angle, separate shots for small detail areas, and idea’s for colors/ the final texture I’m shooting for. This one was photorealism, but this is true for any type of style.
----------------------------------------------------------------------------------------------------------------------------
BLOCKOUT
With any project, you wanna make sure to get proportion and scale right off the bat! The first tip is to import your image planes, and make sure they’re proportional to each other by making one part of the object, then aligning all your planes to it, like so:

Then build out the rest of the object, like so

Make sure to align it in each of the 4 viewports, accusable
by pressing spacebar. Then go to the attribute editor, highlight the image
plane in said camera & check “looking through camera” in the respective camera

Then I recommend having an unreal mannikin on hand, or at least something you know is scaled to the IRL counterpart. Rescale your blockout, and you’re good to start uprezzing!
At this stage, remember to be looking at the shape and form of your prop. The silhouette should read well, even from a blockout phase.
----------------------------------------------------------------------------------------------------------------------------
Low Poly
Low poly work in hard surface is a precise combination of adding divisions, extrusions, bevels in and out, and lots of boolean’s & topology work. An important thing to remember is you want your surfaces to be as, well, hard as possible. It should look smooth shaded from all sides, and things should be even with one another. There’s really no better way to explain it, as what you actually DO for each project will vary very heavily. Each piece a puzzle you must solve, each part a gear in the grander machine.
The important tips are these:
- Know your stages
Some details are deep and need topology, like the divots on the side of the Gameboy, and the indents of the buttons, while other things are subtle enough that can be done in textures, like the letters and speaker holes. Decide in advance where you wanna do each detail, depending on depth and optimization.


- backups on backups on backups
You should keep backups of EVERYTHING. Moving from one phase
to another? Make a duplicate and rename it to the next phase (low poly, high
poly, retop, uv). About to Boolean an object? Make a copy of the target object
AND what you’re using to Boolean! This will give you backups in case you wanna
redo something, cause a lot of operations are permanent.

- SAVE. PLEASE.
Can’t stress this enough: save first and save often! You’re
probably gonna have to lose a few hours of progress to a random crash before
this sticks, but you’ll learn eventually. Ctrl + S is the hotkey to save in most programs!
- Separate but whole
Most objects, especially hard surface objects, aren’t made of
one piece, and thus you shouldn’t try to make it as such. Break it into separate
pieces to reduce topology, retain accuracy, and make your life generally easier.
The only exceptions to this rule is if making the objects one REDUCES topology
AND have very little distance between the pieces combined.


This Gameboy's shell is 2 separate pieces, but we can fake this divide in texturing!
- Reduce, Reuse, Recycle
With hard surfaces, or even general 3d modeling long term, you’ll notice quickly certain shapes and patterns are used different ways in different objects, even in the SAME object sometimes. (IE like a type of screw appearing multiple times, or similar divits across a surface.) Try to duplicate said geo as much as possible to save time, and see if you can build a library of mini shapes you can summon to add to/modify for the latest piece.

The last note on low poly: you
should have all of your critical shapes, with necessary extrusions in, BEFORE
you do any beveling! Beveling everything is apart of high rez work, so unless
the bevel is critical to the shape (IE like the smooth edges on my Gameboy),
leave the smaller ones to its own phase.
----------------------------------------------------------------------------------------------------------------------------
HIGH POLY
High Poly
time. The focuses for this stage are detail balance and concentration. A good
general piece of advice for art is that there should be 1 – 3 focal points
where most of the detail work is, that take up about 30% of your pieces real estate,
and everywhere else should be simple enough to where your eye kinda rolls right
over it and is drawn to the focal points. For replicating an object, concept or
real life, this is secondary to accuracy; but keep it in mind for any works
where you have creative liberty.
Again, I prefer to do my high poly in maya, as I am more comfortable with the tools and controls of said program, but use whatever your most comfortable with. Also keep in mind that some high poly work can also be done in your texturing program with the right knowledge and tools.
For the Gameboy, I was going for a
fresh model look, so I did it in Maya with convert smooth mesh preview to
polygons. Nothing crazy. Big tips I have are:
- make sure to use bevels and creases to hold sharp edges. Creases create more of a smooth edge, whilst bevels can create a harder edge. Use each accordingly, and remember with each you have control for accuracy (creases can be pulled to specific degrees, whilst bevels have customizable precents & divides)
- With bevels: know when to use to chamfers or filets.
Filets are 45 degree/flat angled cuts, chamfers are smooth and usually have
more than 3 divisions. And make sure
EVERY edge is beveled! Even the sharpest cuts, like a knifes edge, have super
small bevels. This helps with accuracy, helps with uprezzing/baking, and adds
visual complexity to the model.


- Make sure your topology and edge loops are consistent. Try
to get a consistent square/rectangle like pattern across your objects. (In Maya
I use quad draw to quickly add, remove, and re-direct edge flow with ease.)
- MAKE A COPY BEFORE YOU UPREZZ! After Beveling and adding any extra edge loops, make a duplicate before you convert to high poly. Firstly it’s just good backup, secondly you can use this pre-uprez as a base for your retop! This is something that hard surface modelers have it easy with c;
That’s it for my high poly knowledge. The rest I do in
texture work; which I’ll discuss later.
RETOP
Your focuses are optimization and patience.
For retopping: you wanna chop off as many unnecessary edge loops as you can
WITHOUT changing your base topology AND with as little n-gons as possible. Now HOW
you do this varies with your program. For some things: decimating your high
poly from maya/zbrush might be the best option, but for most things: you’ll have
to do it by hand. Most programs have some retopping tool or pipeline, and I’ll
show you maya’s multitool for this occasion.
Like I mentioned before:
this is where hard surface modeling is fun-er than usual: as instead of making brand
new topology, you can often just re-use your pre-uprez! Now of course keep in
mind that if you made any changes to geometry in high rez, you’ll have to
account for that with new geo in your retop, but otherwise just grab your pre-
uprezz and start destroying edge loops.
Maya’s magical multi-tool, which I use often even when I’m touching up low’s n uprezzing, is quad draw. This is my swiss army knife whenever I need anything done. I'd def lookup a tutorial on it and all of its complexities, but you can use it to either make a high poly model "live", then create a new low poly geo atop it. OR select an existing obj (normally the pre-uprez) and start removing edge loops.
Annnnd that’s it really! Just
remember:
If it’s a flat surface, you should have as few loops as topologically needed. If it’s a CURVE, don’t be cheap on your loops. Especially on larger curves, you’ll need the topology or people will notice the polygon edges. And remember that any extrusions or indents need to have topology touch all edges.


ALSO: if the player can’t see a face, like a separate piece that clips into another, delete those unseen faces! Saves you poly’s and makes UV’ing way easier.


----------------------------------------------------------------------------------------------------------------------------
UV
Your focuses here are clean edges and optimization. Uv’ing is either really easy or piss difficult, and it really boils down to you to make it either way.
Now if you wanna make whoever textures your work to slap you silly (or you’re tight on time), you’ll just auto uv -> auto layout, and that’ll take care of most IF NOT all the work. It’s a passible pipeline for simple background objects/simple topology. However, assuming you’re not lazy and dislike being slapped, you’ll want to use these tools IN TANDOM with making refinements.
Auto UV is always a good starting point with hard surfaces,
as with most hard surfaces you DO want UV cuts at any sharp/90 degree turns. Select your objects, click it, and start merging edges as necessary.
The only 3 rules I know after that are:
1. NO OVERLAPPING/CLIPPING. Seriously. This ruins your textures outright.
2. No going outside the lines, but try to maximize space.
Outside lines clips your textures, empty space is wasted pixels.
3. Keep things as straight as possible. As long as your geo doesn’t overlap, when you click “unfold”, the geo should snap into as straight lines as possible, assuming its not like a circle or curved.
After that, It’s kinda up to you.

Here's my shell I had. I'll use it to highlight some things.
- try not to have any single/small UV shells you can easily attach to something else; WITHOUT making either curve when you unfold

For the sliders, I let it all be one combined piece w/cuts instead of dividing shells along the 90 degree turns. Making keeping track of its shell much easier.
- Having as few pieces as possible WHISLT retaining straight edges helps you keep track of everything better. Sometimes chopping something off one and attaching it to another helps give you better shells

- Bug Tip: If you click unfold and the shell looks like spaghetti, it means faces are overlapping. Click the "unfold" brush and drag it over the shell until it straightens out and you see what faces overlap. Chop off one of the overlapping faces and try again. If you did it right, the 2 pieces will snap straight after.
- A BIG tip: when you have all the shells complete and are organizing the full piece: Click “orient UV’s” to align the shells, then click “auto layout” to ensure everything is the correct size relative to each other. This will give you a consistent texture size to all your shells. THEN take those pieces and re-arrange them, grouping things relative to each other and similar instances. Then whenever you have to optimize make another copy of the object, then select all the UV shells, scale the shells up AS ONE, and re-arrange. Keep doing this till your satisfied.


After Auto UV'ing, I scaled everything up and got to work. Notice how I grouped similar shapes n shells, and how I fit everything in much tighter WHILST maximizing space compared to the auto UV. BUT the auto UV did the hard work of alinging shells & keeping the textile density. Like so:

Then finally: Combine your objects
into one object (or logical groups if you need things separate) for both your low and high poly's.

BAKING N TEXTURING
Throwing these together as they go hand in hand. Import your model into your favorite texturing program, bake the high onto the low (or click the respective “use low as high poly” if you only have a low), and bake it down. Play with settings relatively and keep in mind the final product (IE optimal game objects should be 1024 MAX for background objects, 2048 - 4096 for hero assets; whatever size for showing off on portfolio). If you run into any problems, google them. But if you did your UV’s properly, you likely will rarely run into baking errors. (Like me)
Now for
texturing. This is again completely dependent to what you're making, so I’m just
gonna give you practical tips that always apply:
- Get a good library of stuff! There’s hundreds of resources out there, materials,
masks, brushes, everything to make texturing easier! Even a good bulk that are
completely FREE. Building a good library can save you a LOT of time, gives you
a consistent style, and results in a more enjoyable texturing experience; all
of which vastly improves your results.
- Keep in mind what your object is actually MADE of, what your final look is, and keep a consistent style over all of your materials. These will guide what materials you use and how to edit each.
- Pay attention to Texel density, IE how big any scratches,
patterns, and stains are relative to the size of the object you’re texturing. Too
big or small will break immersion.
- Work in layers and masks! Instead of coloring everything in the same layer, which is difficult in itself, and makes ANY changes a huge hassle: make each separate color and material its OWN layer, then mask them respectively and edit the mask accordingly. This makes adjusting individual colors and layers SUPER easy, as you just have to select the respective layer and edit!

- This is also a good time to brush up on your color theory knowledge if you haven't already. Keep a color wheel on hand and use known color combinations to help maximize your... color. Remember to also use a primary, secondary, and tertiary colors as well.
- Know the different ways to paint! Use polygon select for mass applying textures, use a mask on your brush for specific patterns n shapes like grills, vents, lettering; etc etc.
- Use a separate paint layer, then with the brush on that
layer turn off everything but height. You can use this layer for any minor bumps
or indents separate of color layers! This is also the alternative to high poly
work for indents n extrusions if you skimped that phase earlier.
- Use generators or smart masks to quickly generate dirt,
rust, grunge, etc. But make sure to right click and then add a paint layer OVER
said generator/mask to add randomness and adjust areas of focus. Remember the
detail concentration & consistency from earlier! (1 - 3 area’s of focus,
30% of the model)

- Make sure to have some breakup on the remaining 70%! Some
dirt or grunge to mix up the color, a fill layer with an edge highlight
generator, some special layer that creates specular breakup; lookup how other
artists polish their works and copy what would apply to yours well.
And FINALLY, a quick tip I learned to help bake some shadows and gradients is to set up an AO generator layer: Setup a fill layer and turn off everything but color, then eyedrop the main color of the object and darken it a bit. Then add a black mask, right click the mask and add a generator. Then click the option box in the generator and set it to “Ambient Occlusion.” Then invert that layer. Do this multiple times if there's too many varying colors (making sure to use a paint layer + vert select to mask out anything you don't want colored with that layer) but you shouldn't need more than 3.
Just look at the difference between these 2 models:


So yeah. Adjust the sliders accordingly and perfect the look you want. Export the textures when you’re done! (OR render in software if you have something special like Marmoset.

----------------------------------------------------------------------------------------------------------------------------
RENDERING
Alright, so you’re finally in your rendering software.
And again, what you do depends on the program; but for Unreal here’s what I do:
I set up a new level, then put in an infinite wall. It’s
just a flat plan with the edges turned up and bevels to create a smooth
transition.
Then I put in my model & a post process volume
Put in a post process volume cube from the volumes tab in "place actors", select it, then turn on infinite unbound, and make sure to set the max and min brightness to 1! This will keep unreal from auto adjusting the exposure.


Now its time for your lights. I recommend an area light for your key light, a directional with shadows turned OFF in the options for your rim, and either a sky dome or an HDRI for your fill.

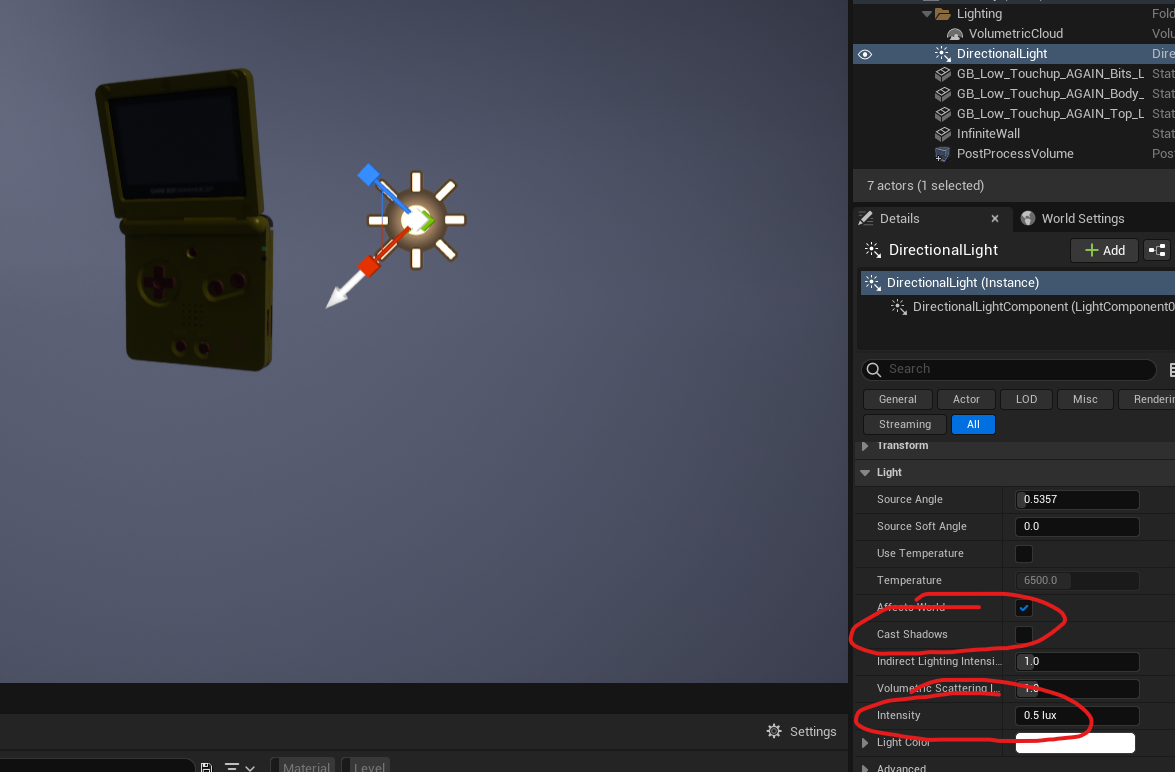

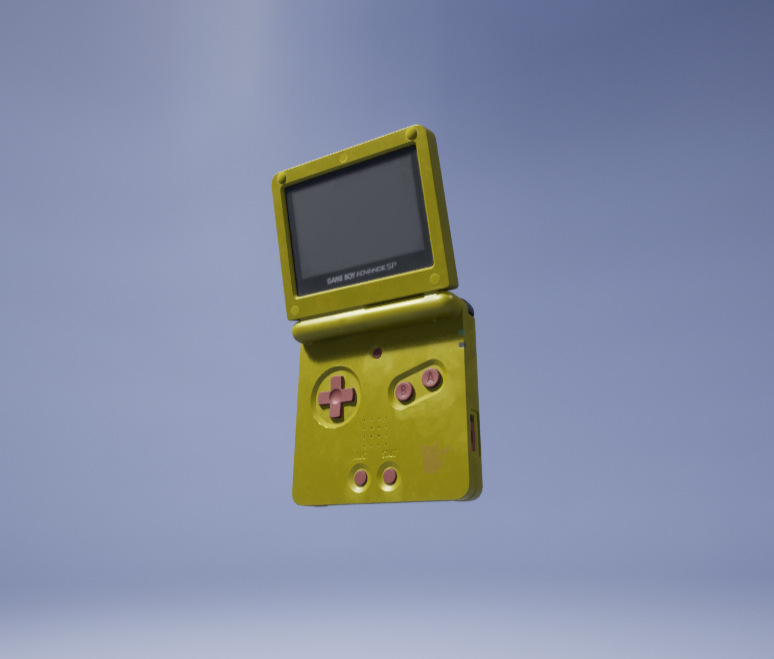
Here's everything combined! Adjust individual lights till its perfected! Get a second opinion if you're not sure what to improve.
IMPORTANT TIP: Make sure to have only the light you are CURRENTLY working on visible, like how I do in my screenshots above. That way you can see and understand how each light is effecting the scene, and which ones to adjust accordingly.
After that get a post process volume cube, set on infinite unbound, and make sure to set the max and min brightness to 1! This will keep unreal from auto adjusting the exposure.
My final tips for showing off:
- Fill the screen!
Fill the empty space as much as you can! Make duplicates of your object, get interesting angles; whatever you can to fill the screen space
- Watch your tangents though
Make sure none of the objects overlap each other OR are too close to the sides of the screen.

See how I maximize the screenspace for my GB WITHOUT getting it too close to the top or bottom? This really lets you see the smudges and metal breakup easily!
- Get turnarounds and specific shots
Make sure to get all the details and describe any complex parts of the process. Things you learned can help others!

Here I duplicate my model to fill the screen space! Note that I could've made this screenshot better by cropping more of the bottom :P
- Make separate lighting setups
If you just wanna show off the model with a simple 3 point lighting that shows off the model, you can. BUT if you wanna draw more interests to your posts, you'll want to make a separate more "artistic" lighting setup; this shows less detail usually, but puts your object in a more interesting scenario for appeal.
Here's an example from a spaceship I made (it's the Rebel flagship from FTL):


----------------------------------------------------------------------------------------------------------------------------
POSTING
You'll also wanna look up other, better artists on Artstation for inspiration; then emulate the way they do things. Emulate me if you wanna keep things simple, but just remember you can aim much higher than I.
After that, set em' all up on your medium of choice, and post it!
That's about it.
Keep in mind things will always be slow in the beginning, regardless of your skill level, then in time as you get better, optimize your process, get better shots, and look up tutorials on how to present better: You'll get numbers eventually.
REFERANCES N RESOURCES:
---------------------------------------------------------------------------------------------------------------------------
CONCLUSION
That's pretty much everything I learned @ my time at FIEA as well as hardsurface modeling.
I'm definitely not the best artist out there, but I'm WAY better then when I started. I'm really thankful for this program, my professional professor Nick Zucc for his art advice, my peers for being amazing artists to be inspired from, and you for reading this.
That's about it tho.
Thanks for reading.
See ya.


